Putting on an Outfit
Putting on an outfit in Wardrobe is simple. Once you have followed the instructions and prepared your inventory (see the Preparations section below), you can put on an outfit with a single click:
Click the icon on your Wardrobe web page or in the inworld closet.
When you click the icon, you will see some information chatted by the Wardrobe HUD (this is only visible to you) saying that it tries to find the outfit in your inventory. If you don't see any such information, make sure you are wearing the Wardrobe HUD of version 2 or later. If you see some cryptic messages, make sure you are using a RLV-capable viewer and have RLV turned on (see the Preparations section below).
Changing Outfits
To change an outfit, the easiest is to take the current one off before putting on the new one, as described above.
Basically, you have two possibilities to remove an outfit:
- Locate the item on your Wardrobe web page, then click the icon on the item.
- Open the "Worn Outfits" window by clicking the button in the toolbar on the Wardrobe web page. This will list all the outfits you're currently wearing. Click the icon on the outfit you want to take off.
Wardrobe also provides a means to automatically take off attachments before the new outfit is worn. It takes some effort to set up, but if you're interested, read more about this in the section Automatically Removing the Previous Outfit below.
Preparations
In order to be able to wear outfits directly through your Wardrobe, certain preconditions have to be met:
- You must use an RLV-capable viewer. Such viewers include
Firestorm,
Catznip,
Imprudence, or
the Restrained Love Viewer.
The latter is what RLV actually stands for, so don't be surprised when you encounter lots of references
to BDSM when you search for the term; it is quite popular in that community.
Don't let this worry you, though. Unless you wear a "RLV relay", a special object that relays RLV commands to your viewer, no one can force you to do anything. - RLV must be enabled. In Firestorm, for instance, it is disabled by default.
To enable it, open the Preferences, go to the "Firestorm" tab and check "Allow remote scripted viewer controls (RLVa)."
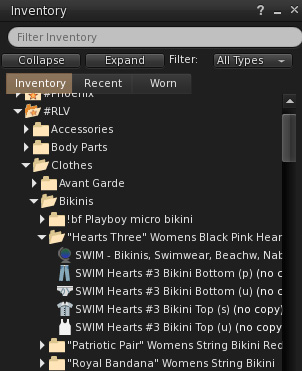
Check out the Wiki how to enable it in other viewers and for more information. - Your outfits must be in the #RLV folder: Your outfits that you want to be able to wear through Wardrobe must reside in a special folder;
it must be named "#RLV" (without the quotation marks), and it must be directly under the "My Inventory" folder.
 There are quite a few tutorials on how to create and populate your #RLV folder, for instance, have a look at
the MoDesign tutorial or
Trix Braveheart's video tutorial (RLVa, if you're using Firestorem, Catznip, or Imprudence),
Trix Braveheart's video tutorial (if you're using the standard RLV viewer).
Make sure you have gone through one of the tutorials and you know how to deal with attachments.
Again, don't be surprised
when you encounter the BDSM context. Also, don't be worried; despite the #RLV folder is called a "shared folder"
(you might encounter that term in respective blogs), no one can actually steal your outfits or get a copy of them.
There are quite a few tutorials on how to create and populate your #RLV folder, for instance, have a look at
the MoDesign tutorial or
Trix Braveheart's video tutorial (RLVa, if you're using Firestorem, Catznip, or Imprudence),
Trix Braveheart's video tutorial (if you're using the standard RLV viewer).
Make sure you have gone through one of the tutorials and you know how to deal with attachments.
Again, don't be surprised
when you encounter the BDSM context. Also, don't be worried; despite the #RLV folder is called a "shared folder"
(you might encounter that term in respective blogs), no one can actually steal your outfits or get a copy of them. - Outfit folder names must match Wardrobe outfit titles. The name of the folder your outfit is contained in must match the title of the outfit in your Wardrobe. If they don't match, Wardrobe can't find the outfit you want to put on, and you will see an error message ("The outfit could not be found in the #RLV folder. Please make sure that it is contained in that folder and that the outfit folder matches the item title in your Wardrobe.").
- Wear the Wardrobe HUD. In order for the "wear outfit" feature to function, you must wear your Wardrobe HUD (version 2 or later).
Also check out the Wiki (which includes excellent information on how to set up and use the RLV folder in combination with Wardrobe) and Chase Eternal's Wardrobe RLV tutorial.
If you encounter problems when you try to wear an outfit (Wardrobe strips your, but doesn't put
any clothing back on), check the name of the folder in your SL inventory:
RLV doesn't work when it contains certain special characters. I found that it didn't work when the name contained slashes (/, \), and the folder name
also must not start with a dot (.). Such folders are invisible to RLV. The subfolders containing no-mod attachments can start with a dot, however.
Also, there is a bug in Phoenix that may in certain circumstances lead to problems when you paste items as links into your RLV folder.
Automatically Removing the Previous Outfit
There are two options how you can define what to remove before new clothing is being put on.
The traditional way, which is still the default method, is to define, on a per-item basis, which attachment points and clothing layers are to be detached before that particular item was put on. This is referred to as the "Attachment Point System".
As of v2.8.1 you have the "Clothing Type System" as an additional option. The idea is that certain types of clothing will replace other specific types of clothing. For instance, a dress will always replace a dress, but it will not remove underwear or jewelry you're wearing.The Clothing Type System
In order to turn the Clothing Type System on, start the Dressing/Undressing System Configuration Wizard by clicking the "Configure Dressing/Undressing System" button in Preferences > Dressing.
You will need to do a one-time configuration process which basically consists of two steps:
- Map your tags to clothing types. It is fine to map more than one tag to a clothing type, or none at all, if you don't have any clothing of that type.
-
Define your customized matrix of what to remove when a certain type of clothing is put on. A pre-populated template is provided for your convenience, which you can tweak to your own needs.
In the matrix, each row represents the type of the clothing to be put on. Tick all the boxes on the row of the types of clothing you want removed when clothing of the type corresponding to the row is put on.In the example to the right, consider the first row labeled "Underwear", for instance. You can see that the "Underwear", "Bra", "Panties", "Bralette", "Corset", "Bodysuit", and "Pasties" columns are checked, which means that whenever you put on an item having a tag corresponding to the "Underwear" clothing type, any item with the clothing types "Underwear", "Bra", "Panties", Bralette", "Corset", "Bodysuit", or "Pasties" will be removed first.
Once you're configured the Clothing Type System, note how all tags you've mapped to a clothing type will be highlighted as shown in the example item to the right.
Use this to check if your items have the correct clothing type tags.


Please note that in order to use the Clothing Type System, RLV must be able to read the clothing you're wearing. In particular, if you use links in the #RLV folder, they must point to targets within the #RLV folder, otherwise it won't be able to determine what you are wearing. You can check this if you see the items listed you're currently wearing when you open the "Worn Outfits" dialog.
The Attachment Point System
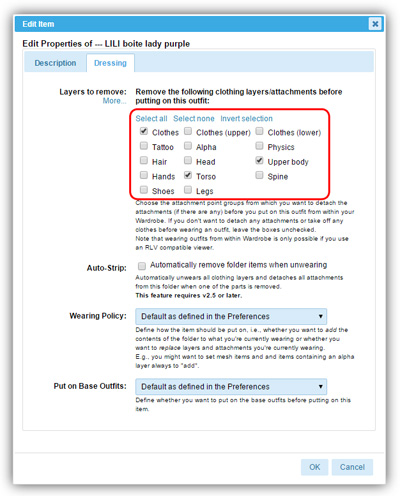
You can set up your items to automatically detach clothing and attachments before the new item is worn. To do that, you'll need to define on a per-item basis what is removed before that item is put on: click the icon on the outfit, which will display the "Edit Item" dialog (shown on the right).
In the dressing tab, under "Layers to remove," tick the parts you want removed before the item is worn. In this example above, all the clothing layers, all the objects on the upper body (chest, shoulders, arms, hands, and spine) and the pelvis will be detached before the new outfit is put on. Everything worn on the skull (typically your hair) and your head as well as on your legs (including feet) will stay in place.
If you want more fine-grained control over what should be removed, click the "More..." link, and all available attachment points are shown.
Wardrobe has a feature to automatically guess what should be taken off, based on title, tags, and remarks you enter. To turn on this feature, tick the box &qout;Let Wardrobe guess" in Preferences > New Item Defaults > Layers/attachments to remove before wearing.
Please note that this is a setting that applies to newly created items, i.e., existing items won't be changed when you change this setting.
Base Outfits
The key idea of base outfits is to create shortcuts to frequently used Wardrobe items. E.g., these could be your favorite skins, hairdos, nails, jewelry—items you wear most of the time. So, base outfits are there for you to put on items quickly without having to find them in your Wardrobe first. (Note that base outfits are only useful if you use Wardrobe for dressing; if you don't want to use any base outfits, you can also hide the bar by clicking Tools > Hide Base Outfits.)
Adding an item to the base outfits bar
- All to the right of the bar, click the link "Activate editing" (if you have a small screen and you see a horizontal scroll bar, you might have to scroll to see this link).
- Find the item you want to add to the bar in your Wardrobe.
- Grab the item's title with your mouse (click, but don't let go), and drag it onto the bar.
- If your mouse pointer is over the bar, you'll notice that it will turn yellow.
- Now drop the item (i.e., let go of the mouse button).
To put on an item from your base outfit bar, simply click it.
You can remove an item from your base outfits bar by clicking the (X) icon in the right upper corner of the item while editing is activated.